Your Cart is Empty

HOW TO MAKE A CARBON FIBER '99-'04 FORD MUSTANG RADIATOR COVER
Platform: 99-04 Ford Mustang
Design: SVTONLY
Idea Creation
It’s not always possible, or economical, to machine nice metal or foam molds for every part you want to make (seems to be the theme of our blog). When you have an existing part made of metal, plastic, or any other smooth material, you can replicate the part in carbon fiber by pulling a “splash” mold. This blog will walk you through the steps of making a 99-04 Mustang Radiator Cover from an existing sheet metal part that was made for our friends atSVTONLY.
Plug Creation
We were supplied with the original sheet metal part fresh off the break. It was important to ensure that the part had no under cuts and that the surface finish was nice. We went ahead and did a little bit of sanding with some steel wool and high grit sand paper to get a nice polished surface. It is at this point that I would like to make an important note: *DON’T PULL A MOLD OFF A GALVANIZED SURFACE** The surface looked perfect and smooth, but it actually was galvanized. It turns out this has a peculiar interaction with Partall Paste Wax #2. This didn’t ruin the mold, but it did result in an extra day of sanding, filling, and spraying to recover from it.

Once the part is as smooth and polished as you want your final part, you need to add flanges so that you have room for vacuum tape and resin ports. Ideally you want to use a smooth rigid material that can be waxed to release easily. A thick plastic would be ideal, but this is expensive so I recommend a sheet of whiteboard material from Home Depot for $10. The surface isn’t perfectly smooth, but it will release with a few layers of wax. Cut this material to shape and glue onto the back side of the part.

Ideally you want 4 inches of flange around your entire part. There will be seams, but these can be filled with wax or a silicone caulking so that the mold won’t get stuck. It is also important for your splash mold to stay rigid so that the mold takes the exact shape of the part. We cut some stiffening ribs to run along the back side and bonded them on with Bondo.

The plug itself is temporary and intended to be cheap. Don’t spend too much time here as you will expect this to come apart when you pull the mold. The final result is a plug that is ready to be gel coated and turned into a mold.

For more information on building a plug, check out our process blogs onsplash plug fabrication,machining a foam plug, andplug finishing.
Mold Creation
In order to create a nice surface finish on your mold, I recommend applying a layer of tooling gel coat to your plug. This is done only after the entire plug has been waxed several times over with the release agent of your choosing. We used Partall Green Paste, but I would recommend TR 104 wax for most applications. The gel coat will be applied on the plug, but removed with the mold like a candy shell coating. (Remember the Magic Shell chocolate you used to put on ice cream?) Gel coat is typically sprayed onto a part with an expensive gun, but it can be also be painted on with a $1.35 brush. Gel coat will never air cure (unless mixed with a special additive) so simply paint it on in a few layers until you have built up about 0.030” of material and wait for it to get tacky. It is at this point that you are ready to fiberglass your mold.

This is where the fun begins! Using chopped strand mat fiberglass, cover the entire black gel coat surface. Many layers will be applied until you have a part thickness of 1/8” to ¼”, but you must apply fiberglass resin (Polyester Resin) between each layer until the fiberglass is fully wetted out. The white fiberglass should turn completely transparent when wet.

After about 5 layers of fiberglass, stiffening can be added to the mold to reduce the amount of fiberglass that must be used. We cut more ¼” MDF board into strips to run along the middle of the part and cross sections to stiffen it along the length. An additional 5 layers should be added on top of this to get to approximately the correct thickness. The final mold should look black like the gel coat underneath it with a white beard around the edges of dry fiberglass that will later be trimmed.

Leave the mold to cure overnight and make sure the gel coat has fully hardened before pulling the mold from the plug. Due to the incompatibility of the galvanization and the wax, we had some issues here and had to break the plug out. The surface finish on the flanges was great, but the actual part had a textured swirl as a result of the reaction. We ended up sanding as much of this pattern out as possible and then filled the rest of it with spot putty.

In order to get back to the perfect surface finish we were looking for, we ended up spraying the mold with a fresh layer of gel coat. I mentioned earlier that it doesn’t air cure so we had to mix it 1:1 with hi-gloss additive. You can see from this picture that the result was a mirror finish. A little bit of wet sanding and some buffing and the mold was ready to use!
You can learn more about these steps in our posts onspraying gelcoat, themold lamination process, andhow to finish your mold.

Do also note the second mold behind the radiator cover mold. We were simultaneously working on door sills to go with this part. I somehow managed to forget to take pictures of the lay-up for the radiator covers so the next few pictures will be the door sills.
Layup Process
With the mold complete we were ready to make our first part. We infused the part in order to achieve a thick glossy resin outer surface. The next few pictures show the setup for the infusion process of one of the carbon fiber door sills starting with the tacky tape:

Then the carbon fiber:

Followed by release cloth, green flow, and spiral tube vacuum ports:

The part was then ready to pull vacuum to test the bagging:

Everything looked good! Time to infuse the resin. Watch as it slowly makes its way across the entire part.

Interested in learning more about this process? Check out our process blog post on theVARTM infusion process!
Part Finishing
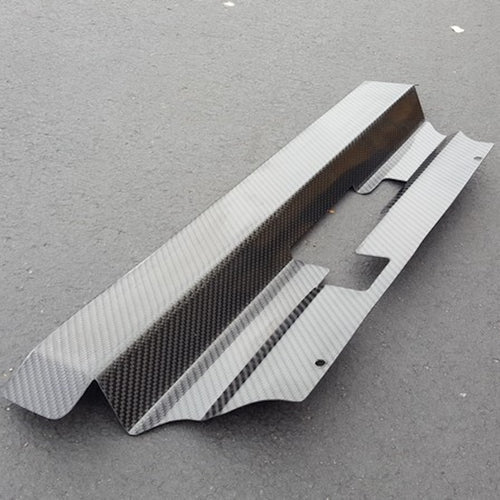
Okay, back to the radiator cover! After completing the infusion process above, the part was left to cure overnight. The following day the part was pulled from the mold and the resulting part follows:

Couldn’t be happier with the surface finish! The part has yet to be trimmed, but do note how close to a final part this looks like already. We used our laser to cut the dry carbon fiber exactly to size plus a ¼” extra so that there would be limited trimming required on the final part.
Despite the laser cut carbon, there was still a bit of trim work required. This was completed with a Dremel and a trim jig provided bySVTONLYfor high precision. Lots of carbon dust… but it was now able to fit snuggly back into the mold.

One more round of buffing and waxing and the part is ready to go. The original part came in handy as a fixture to hold the part during this process. Learn more about the intricacies of the finishing process in our posts ontrimming carbon fiber,how to spray clear coat andbuffing and polishing best practices.

And at last, the moment we have all been waiting for! The radiator cover is complete and ready to go meet its lucky Mustang.
Final Build

This was just the first part of many to be made with this mold, and there are certainly changes to be made in the future to make the mold/part even better. Overall though, this part turned out extremely well, especially for a part that was pulled from a splash mold. I hope this post will inspire you to make a replica of an existing part using a splash mold!