Your Cart is Empty
DESIGNED IN SEATTLE | MADE IN SEATTLE
DESIGNED IN SEATTLE | MADE IN SEATTLE

HOW TO MAKE A CARBON FIBER DUCATI WHEEL HUGGER
May 18, 2020 3 min read
Platform: Ducati
Design: Common Fibers
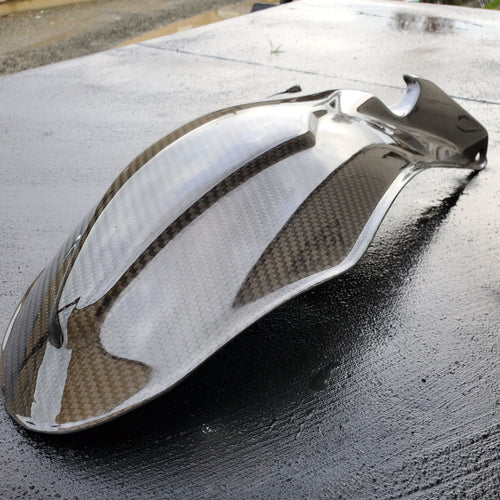
This project was brought to our custom composites manufacturing shop in Seattle, WA by a local individual who wanted to increase the length of the rear fender of their Ducati. The result was a custom carbon fiber fender that's both functional and has serious style.
Idea Creation

The inspiration for this project came from a desire to avoid the dreaded rooster tail, well known by any biker in the wet Pacific Northwest. The original rear fender is pictured above. In addition to keeping the rider dry, we needed to account for the components nested in the OEM part.
A 3D scan was taken of the original short fender to ensure that then new fender would interface properly with the existing components. Our design team tested critical areas by 3D printing prototype pieces to confirm fitment before making a plug.
Want to learn more about designing carbon fiber parts? Check out our post ondesigning composite parts for an introduction to our design process!
Plug Creation
Materials: 15lb Tooling Foam, Duratec Sanding Primer
Time Required: 10 Hours

The plug was machined on our 4-Axis CNC, using 15lb tooling foam. The intricate details of the plug were sanded as little as possible to maintain the correct form. For more information on building a plug, check out our process blogs onsplash plug fabrication,machining a foam plug,andplug finishing.
Mold Creation
Materials:Tooling Gelcoat,Fiberglass Chopped Strand Mat,Polyester Tooling Resin
Time Required: 10 Hours

After tooling gelcoat was applied, strings of fiberglass were laid into any tight radii on the plug to ensure that the edges of the mold were backed with material. This plug was fiberglassed in 2 sessions - the first string and a single thin layer of chopped strand mat, and the second to bulk the mold.
This mold included countersink features that ended up being removed, after test fitting showed that the fixture points needed to move. We were able to grind out the original features and build the new shape with bondo, which was then recovered with gelcoat.
You can learn more about these steps in our posts onspraying gelcoat,themold lamination process, andhow to finish your mold.
Layup Process
Materials: 6K Carbon Fiber Fabric, Epoxy Resin, 3mm Foam Core
Time Required: 1.5 Hours


This lay-up required 4 layers of 6K twill carbon fiber fabric, 2 layers of fiberglass, and a section of 3mm core through the middle of the fender for added stiffness. Putting down the first 'cosmetic' layer of carbon fiber fabric without seam lines can be challenging - here we were able to hide it in one of pockets for the bike's components.
Check out our blog posts for an in depth look at the VARTM infusion process and stay tuned for a post on troubleshooting difficult seams!
Part Finishing
Materials: Primer, Clear Coat, 3M Buffing and Polishing Compounds,Boss Perfecting Foam Pads
Time Required: 3 Hours

Painting carbon fiber is notoriously challenging, due to its porous nature. To address that, the fender was flooded with a clear-coat primer before being finished with a gloss clear coat. All of the intricate features at the front were meticulously buffed and polished with our DA and Boss Perfecting Foam Pads.
You can learn more about the intricacies of the finishing process in our posts on trimming carbon fiber,how to spray clear coatandbuffing and polishing best practices.
Final Build


Subscribe
Sign up to get the latest on sales, new releases and more …
