Your Cart is Empty

HOW TO MAKE A CARBON FIBER HONDA CIVIC TYPE R ENGINE COVER
Platform: Honda Civic Type R
Design: Individual/Common Fibers Group Buy
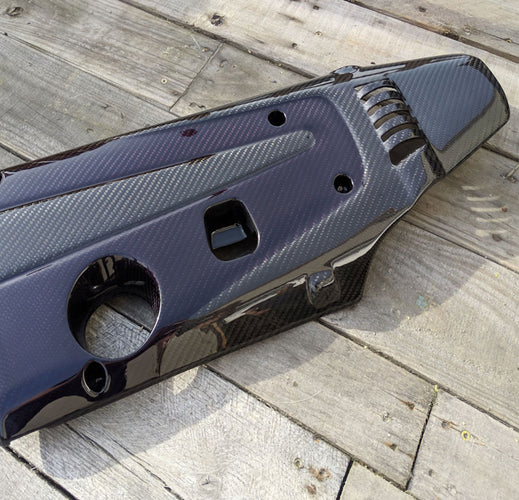
This project was brought to our composites manufacturing shop in Seattle, WA by an individualwith a highly customized purple 10th generation Honda Civic Type R. After we delivered the first engine cover to it's owner (beautifully finished in two-tone clear and purple), the owner opted to leave the mold and production rights to Common Fibers. Check out itspage on CF Group Buyif you'd like to buy one now or join the next group buy for a reduced price (don't worry - they're not all purple!).
Idea Creation
This cover is the centerpiece of the engine bay, making it an ideal part for aesthetic customization. It's also one of the more challenging pieces to replicate - the engine cover must not only be able to withstand the heat of the engine bay, but also fit correctly with a number of other components and fixtures. To ensure proper fit, we 3D scanned the OEM Honda cover. We opted to fabricate the mounting standoffs separately from high-temp plastic and post bond them to the cover because they would be difficult to replicate in the molded part with acceptable tolerances.
Curious about how we decided to to take the project in this direction? Check out our post ondesigning composite partsfor an introduction to our design process!


Plug Creation
Materials: General Plastics FR4515 Tooling Foam, Duratec Sanding Primer


We used the 3D scan to machine the plug for the mold from 15lb density tooling foam. The 3D scan also allowed us to create a CNC trim jig to trim the parts after they were molded. Precision trimming was important to ensure that the bolt holes and various cutouts in the engine cover matched their corresponding parts on the engine exactly.
For more detail about the methods we used to create our plug, check out our process blogs onsplash plug fabrication,machining a foam plug,andplug finishing.
Mold Creation
Materials: Tooling Gelcoat, Fiberglass Chopped Strand Mat, Polyester Tooling Resin
We used our standard fiberglass mold lamination process to create the mold for this project. Care was taken to make sure fiberglass was well compacted into the intricate features of the cover, but otherwise this mold didn't present any special challenges. You can learn more about the steps used to create our mold by reading our posts onspraying gelcoat,themold lamination process, andhow to finish your mold.
LAYUP PROCESS
Materials:6K Twill Carbon Fiber Fabric, Epolam 2090R/20206H High Temperature Epoxy Resin System

Some extra work upfront with our templating laser made this layup much easier. If we had tried to lay a single continuous sheet of carbon fiber over all the protruding standoffs in the mold, it would've been nearly impossible to maintain a perfect weave pattern as the weave would distort around these features. Fortunately, the standoffs are not seen when the cover is installed, so we could cut them out of the first layer of carbon fiber and lay them up using separate pieces.
We first created a template of the mold by hand using a piece of butcher paper, being careful to mark the features that would need to be removed to leave us with a flat, undistorted pattern. We then converted the template to an Adobe Illustrator file that our laser could use to cut the pattern out of a sheet of carbon fiber fabric. The sheet was then laid carefully around the standoffs. Our flow media was cut using the same template to avoid any bridging.
Unlike most of the parts we make, the engine cover required a high temperature epoxy resin to survive the hot environment within the engine bay. Interestingly, the part showed no "die back" - the characteristic "wrinkling" that appears when resin shrinks during post-curing in the oven - which we attribute to the heat-resistant properties of the resin.
Check out our other blog posts for an in depth look at theVARTM infusion processand stay tuned for an upcoming post on how to lay in the first layer of carbon on a cosmetic part.
Part Finishing
Materials: High Build Clear Coat Primer, UV Resistant Clear Coat, 3M Buffing and Polishing Compounds, Boss Perfecting Foam Pads


The work required to create the unique two-tone purple tinted clear coat finish for the engine cover was significantly more involved than our typical gloss clear coat. We began with our usualsurface preparationandclear primerprocesses, but after laying down a coat of primer and prepping the surface again, we masked off the cover with a vinyl laser-cut template, leaving just the areas to be tinted purple exposed. We then hand-tinted our clear coat purple and sprayed the cover. After the purple dried, we coated the entire engine cover twice more with gloss clear coat.
A word of caution - it is extremely difficult to tint clear coat to exactly the same color twice, so it's very important that you don't burn through the tinted layer when you're sanding and buffing the part. If you do, you can't touch up the burn through (it won't match!), so the only way to correct it is to sand the entire part back down to the primer and repaint it with freshly tinted clear coat.
You can learn more about the finishing process we use in our posts ontrimming carbon fiber,how to spray clear coatandbuffing and polishing best practices.
Final Build
At the beginning of this post, we mentioned that we chose to make the standoffs for the mounting bolts separately, out of 3D printed high-temp plastic. We knew these features had to be exact, but the standoffs are on the backside of the part where it's possible to get wrinkling and bridging using theVARTM molding process. We could have created a two-sided mold or used "pre-preg" carbon fiber, but both of these processes would've dramatically increased the tooling cost for this project.
Instead, it's relatively easy and inexpensive for us to mill the wrinkly ends of the standoffs down to a certain height while we're trimming the rest of the part on the CNC, and then after paint and finish work, we're can glue on precise 3D printed standoffs. We still needed to ensure that the standoffs were glued on at the right orientation, however, so we created a simple jig to make assembly possible.
We used our 3D scan to model exactly where each standoff needed to be glued to the engine cover, and machined a foam jig that mimicked the mounting points on the engine. The plastic standoffs slide over threaded rods inserted into the jig so that they sit at the correct level and orientation. We lay a bead of composite specific urethane adhesive onto the mating surface of the standoffs, and then slide the cover over the same rods and onto the standoffs. The adhesive then cures with the standoffs in exactly the right place, ensuring a perfect fit, an incredible looking engine bay, and a happy customer.


