Your Cart is Empty

HOW TO MAKE A CARBON FIBER MASERATI GHIBLI ENGINE COVER
Platform: Maserati Ghibli
Design: Individual
Idea Creation
The engine cover is the centerpiece of the engine bay. It takes up the most real estate and makes the biggest impact. An individual hired Common Fibers to create a stunning replica in carbon fiber.
Plug Creation
The picture below shows the OEM install of the engine cover in the Maserati. In the end we need to ensure the new cover has a perfect fit and will not interfere with any of the other components. The easiest way to ensure this is to pull a splash mold off of the part.

But pulling a splash mold isn’t always the easiest thing to do when your part is made of multiple components. So first it is important to understand what you are working with. Take apart your engine cover and isolate the components that should actually be molded in. Most likely, incorporating the emblem into the mold just isn’t going to work. We took this engine cover apart and decided that the black and silver components should be molded as one instead of as two separate parts. This will save a lot of time on trimming in the end.

With a plan laid out, it is time to get to work. We started by first cutting down a board of Melamine to the approximate shape of the part with an additional 6 inches around all the edges for flange. Be generous and give yourself lots of space!
Before mounting the part to the board, it is important to fill any areas that will later be cutout. In the case of the Maserati Ghibli, there is a cutout for the oil cap and what looks to be the alternator. We used 1/8″ plastic that could bend to shape to cover these cutouts. Simply duct tape the plastic in place and add some Bondo™ to the back side for additional support. At this point we also went ahead and filled in the indent of the Maserati emblem. Getting that detail molded into the new part could be difficult so we opted to simply attach the trident to a smooth carbon surface.

Lastly, bond the engine cover to the Melamine with some 2×4 blocks and Bondo™. It is important that the part is well bonded to the board and will not flex. I recommend cutting the blocks of wood as close to the height of the part as you can and then piling a large scoop of Bondo™ to the top of it. When you push the part down onto the Bondo™ blocks it should self-level. Let the Bondo™ dry for 15 minutes before proceeding.

With the plug prepped, it is time to start the molding process. That means wax, and lots of it! For making molds, we always use 4-5 layers of green Partall followed by a heavy layer of PVA.

A part of this size can use about 1.5 cups of PVA sprayed from an HVLP gun. If you don’t have a spray gun, PVA can be applied with a foam brush, although this does tend to leave streaks on the final mold surface. These streaks can be sanded out of the gelcoat, but it does add an additional step. In the case of a complex part like this, it is very likely the mold will need a second layer of gelcoat so these streaks will not matter. After applying the PVA, let it dry until it is no longer wet to the touch. Insufficient drying of the PVA will result in a poor mold surface finish.

For more information on building a plug, check out our process blogs onsplash plug fabrication,machining a foam plug, andplug finishing.
Mold Creation
The next step is to apply the gelcoat. The gelcoat is what will actually replicate the fine details of the existing part. To achieve the best results, gelcoat should be sprayed from an HVLP gun. Once again, if a spray gun is not available, gelcoat can be applied with a foam brush. When spraying it, the ideal thickness is 18-20 mils thick. Use aMil Gaugeto determine how thick you have sprayed. You don’t want to apply more than 24 mils in a single coat or you could have curing issues. A part of this size will take approximately 1 pint (16oz) for full coverage. After this layer has mostly tacked up, additional gelcoat can be applied to seams and high-detail areas. This will ensure a thick candy shell coating that won’t crack.

After the gelcoat has cured to the touch and will no longer transfer color to your finger, you are ready to proceed. Gelcoat is designed to not cure in air so it will always remain tacky until it has been smothered in resin and fiberglass.
This next step is where things get a little tricky; this is not your standard mold. We want to capture all of the detail of this engine cover all the way to its edge; however, we didn’t fill in all the gaps between the engine cover and the Melamine table. This means that we need to do a light initial layer of fiberglass just on the part. Some fiberglass will stick over the edge but this will be trimmed off after it cures. Apply chopped strand fiberglass and polyester resin with paint brushes and aroller. It is very important to ensure there are NO air pockets under the first layer of fiberglass. Using the roller, all air should be removed so that the surface of the mold looks black. Any white air pockets need to be rolled out.

With the initial layers (2-3) complete and cured, we trimmed off the excess with a Dremel™. If this was not trimmed, the engine cover could get stuck in the mold due to the undercut of the fiberglass under the part.

With the part trimmed back, it is time to bulk up the mold and drape additional fiberglass over the edges to make a solid 4-6 inch flange. In total, about 3 yards of 10 oz mat were needed for this mold. Do note the whiteness in the picture below. Your mold shouldn’t look like this! It started to rain while performing this layup so it got a little wet before getting wheeled back inside. The milkiness is caused by the moisture mixed with the resin. A typical fiberglass layup should be transparent and the color of your gelcoat should show through.

In a perfect world, this mold would be pulled from the plug and be ready to make your first carbon fiber part. This isn’t the case; we write these blogs to prepare you for the real world. With the amount of intricacies in this part there are bound to be issues in the mold. In this case, we started by trimming off the extra flange and examining the interior flaws. You can use a jig-saw, skill-saw, Dremel, pneumatic “fart saw”, or even a handsaw to cut off the excess fiberglass.

There are a handful of gelcoat issues that can be seen in the image above. We knew that the draped edges would need to be filled, but there are other details that were just too fine to copy over well. The result is a few hours of Bondo™ detailing work and sanding:

After all holes have been filled and sanded, an extra layer of gelcoat can be applied in a thin (~10 mil) layer. This will leave you with a fresh candy shell top layer that can be polished smooth. Bondo™ is far too porous of a material to act as a good mold surface so this step is highly recommended. This has to be applied with a spray gun. Using a paint brush will result in far too much running and loss in mold detail. Do also note that gelcoat typically doesn’t air cure. In order for it to cure in an open mold itmustbe mixed with a hi-gloss additive. Be sure to also wear your special gelcoat pants when spraying!

With the new gelcoat layer on the mold, you are ready to do your final sanding and buffing to prep the mold for a layup. From this point forward, all sanding should be wet sanding to ensure the surface can be buffed to a glossy finish.

Wet sand starting at 400 grit (lower grits only on large issues spots) and step up to 1,500 grit. These ultra-high grit papers can be found at most auto stores. Make sure that before you step up to the next grit you have sanded until all scratches from the previous grit have been removed. Once through all the sandpaper, the mold should be buffed to a high gloss surface finish. The surface finish of the mold will transfer to the carbon fiber part.

You can see in the image above that we still even sanded through some of the final gelcoat. This is going to happen and that is okay. So long as the mold is smooth, the surface finish of the final part can be modified. In most cases a carbon fiber part will be sanded and eventually clear coated.
You can learn more about these steps in our posts onspraying gelcoat, themold lamination process, andhow to finish your mold.
Layup Process
With the mold finally done after approximately 15 hours of labor, we are ready to make the first part. This engine cover will be made with the resin infusion process. This will ensure that the carbon weave is straight and fully resined out; however, it is a more difficult process than a wet layup. Check out our blog post onVARTM infusionsfor an in depth look at this process.

This engine cover was made with a single top layer of 6K twill and 6 layers of 6K plain weave carbon fiber. The picture above shows the carbon fiber layered into the mold. You can see that the plain weave was trimmed around the oil cap hole. This is important for sharp radii and high detail areas. If the carbon fiber is too stiff to push into all areas it can “bridge” and cause resin dense areas.
With the carbon in place, it is time to seal up the vacuum bag. The materials on top of the carbon fiber include 2 layers of peel-ply, 1 layer of green flow medium, and the vac-bag. Two sections of spiral tubing are run around the exterior of the part as a resin injection port and a vacuum port. The measuring cup happened to be the perfect fit around the oil cap hole. Use tools like this to apply pressure to difficult to reach areas.

Once the different layers have been secured, pull vacuum on the part and ensure a perfectseal. Turn off the vacuum and let the part sit for 15 minutes. If the vacuum gauge has changed position at all, search for leaks and repeat. Any air in the part can result in irreversible damage. Once you are certain the bag is sealed it is time to infuse the resin as shown below.

The infusion of a part of this size can take anywhere between 10 and 20 minutes. Factors that effect the infusion time are the viscosity of the resin, the amount of layers of carbon fiber, and the placement of the flow medium. Ensuring the flow medium covers the entire part will increase the probability of success significantly. A completed resin infusion will look like the image below:

All of the sharpie lines drawn across the part are used to monitor flow direction and speed. If you notice areas are not getting infused as fast as other areas, consider adding extra flow medium to that area next time. A typical epoxy should be allowed to cure overnight before removing from the mold. Be sure to read the cure time on the specific resin you choose, as some infusion resins can be known to take 48 hours to cure. To speed up the process, heat can always be applied. For a part such as this, a high temperature infusion resin is recommended to ensure the part maintains its shape in the engine bay.
Part Finishing
After the part has cured, remove it from the mold and remove all of the bagging materials. If all went well, the part should look something like the image below. Don’t beat yourself up if it doesn’t look like this on the first try. Always assume that the first part from the mold will have some issues.

When you have an infused part that you are happy with, you will be ready to trim it down to the final shape. Ideally your mold will have some score lines or clearly defined edges to follow, but this isn’t always the case. Use a silver sharpie to draw out the general shape of the trim if the edges are not obvious. The key to a good trim is a secured part. Be sure to clamp the part down to a sturdy table however possible. I suggest using some sort of soft fabric to pad the top side of the part so that it doesn’t become horribly scratched.

There are always a handful of tool options for trimming a part to its final shape. In most cases, a Dremel™ tool will be the answer to all your trimming needs. I suggest using the flexible wand attachment for more maneuverability. As for the best cutting wheel, there are a few options. Dremel™ sells a nicediamond cutoff wheelthat is great for cutting straight edges. These wheels are somewhat expensive, but they do last a long time. Alternatively, a gritty carbide cutoff wheel can be a good option. These wheels are less precise but are capable of grinding on the side edges, which makes them great for carving and clearing out corners. As a general rule, leave a little extra material that can be sanded off by hand after the trim is complete. In the GIF below you can see that the cut is on the outside of the silver line.
With the engine cover fully trimmed, you are ready for a final edge sanding and surface buffing. A nicely trimmed part should look like the picture below. Most of the silver Sharpie line will be showing around the edge and can be hand-sanded smooth.

Start with a pretty aggressive sandpaper on a foam block to smooth out the edges. There will inevitably be a spot where the Dremel™ ate too much carbon fiber. Use your sanding block to blend in this edge so that it looks nice. Always remember, a custom carbon fiber part like this is a piece of art and will never be perfect or identical to the one before it. After the edges are cleaned up, the part should look a lot more finished like the picture below. Use acetone to clean off any extra Sharpie marks.

Prior to final assembly, the carbon part is ready for a nice buffing to bring out its full hi-gloss surface finish. Alternative to buffing is a layer of clearcoat (but even that will need to be buffed). I recommend clearcoat for all external carbon fiber components because every epoxy resin will eventually yellow out. A UV protective clearcoat is the only thing that will prevent that. In this case, the part is going to be hidden in the engine bay for 99% of its life so the clearcoat was skipped. Instead, we buffed the surface to a shiny finish. Once again, fixturing the part to a table is key to a nice buff.

We typically use a standard 6 inch orbital buffing wheel, but a drill attachment can be useful for getting into the smaller details of the engine cover. You can learn more about the intricacies of the finishing process in our posts ontrimming carbon fiber,how to spray clear coat andbuffing and polishing best practices.
Final Build
Now the carbon work may be done, but the engine cover still needs to attach to the engine. A custom mounting system could be devised to attach it, but in this case we opted to use the mounts on the original engine cover. To do this we cut out the interfering components of the mounting panel from the original engine cover and epoxied it to the new carbon cover.

Using this plastic panel on the bottom of the part actually acts as a heat shield which will be good for the longevity of the part. A high temperature epoxy is recommended for this process:

With the epoxy in place, clamp the two components together and allow to cure for 24 hours.

Additional heat shielding can be achieved with the use of gold foil on the exposed carbon fiber:

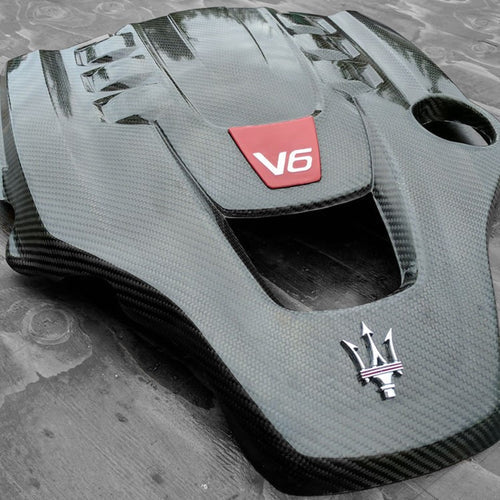
With the underside complete, the V6 and trident emblems can be reattached to complete the Maserati engine cover.

All that is left is the final installation within the car! This project took approximately 20 hours to complete and cost $250 in materials. Reach out for help on your next carbon fiber project!

