Your Cart is Empty

HOW TO MAKE A CARBON FIBER MITSUBISHI EVO TURBO INLET DUCT
Platform: Mitsubishi EVO
Design: Ozzy Motors
Idea Creation
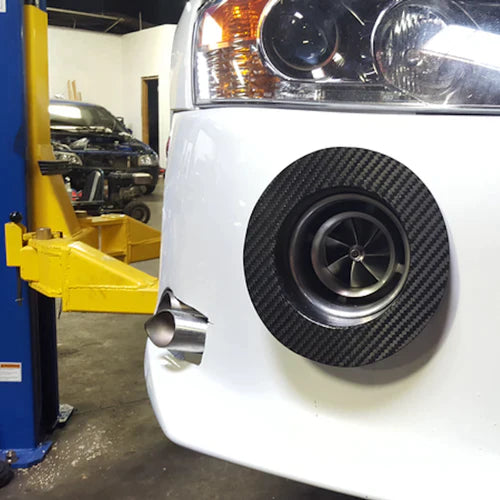
It’s important that your turbo gets as much air as possible. For this reason, a cutout is often made in the bumper of the car to force additional air into the turbine while driving. To make this as clean as possible, it’s important to restrict the air from going anywhere but into the turbo. To do this you need a turbo duct, and what better material to use than carbon fiber! Lucky for us, our friends at Ozzy Motors needed one for their 1,000+ HP EVO! This walk through will show you how anyone can make a carbon fiber turbo duct from a $15 ABS pipe mold, in one layup, in just 2 days.
Plug Creation
This was pretty easy and actually only required a tape measure to complete. All we needed was the turbo diameter (5 inches) as well as the distance from the front of the bumper to the front of the turbo. This length determined the angle that the plug needed to be cut at. With these dimensions in hand it was time to start the plug!

After spending $15 at Home Depot we were ready to make the worlds cheapest and easiest plug! It happens that the outer diameter of a 4 inch ABS pipe coupler and cap is 5.06 inches. Perfect fit for us! We bought a coupler, a cap and a small section of 4 inch pipe to connect the two together. Once assembled, we used the dimensions taken from before to determine the angle to cut the plug to. Good old SOHCAHTOA came through again!

A little bit of sanding and waxing and the plug was ready to go! We also waxed a mirror surface to do the layup on for a glossy finish.
For more information on building a plug, check out our process blogs onsplash plug fabrication,machining a foam plug, andplug finishing.
Layup Process
This is where we got creative and I encourage you to do the same for your next project! In order to create the flange that sticks out from the tube, we used a two part mold: the mirror and the ABS plug. The picture below is a diagram of the layup for reference. The red lines are the layers of carbon fiber.

It is important to do a layup like this in the correct order so I have laid it out below:
- Lay a single resined layer on the waxed mirror surface.
- Place the waxed ABS plug onto the center of the first sheet of carbon. Note that carbon now within this circle will not have any vacuum applied to it. This is okay because it will get cut out anyways.
- Lay smaller pieces around the radius of the plug until the entire cylinder is contained. Make sure the carbon is filling the radius as best as possible.
- Wrap the entire cylinder with one final layer of carbon fiber to hold it all together.
- Layer with small strips of release cloth. Use a lot of this! Too little and it will be a pain to remove.
- Add one layer of breather bleeder fabric on top. I recommend cutting out a circle so that there are not extra wrinkles and creases around the radius. The picture below shows what the layup should look like at this point:

- Before drawing vacuum I would recommend one last trick: Run a low gauge wire or a small diameter flexible tube around the base where the plug meets the mirror. What this does is help compact the radius while under vacuum. It is often difficult to pull vacuum in a small radius like this, especially when it is under cut like it is in this layup. Adding something here will help ensure a good compact layup. Be sure to add this on top of your release cloth or it will get stuck permanently! Note the large speaker wire in the following picture:

- Finally, pull vacuum on the part and make sure there are plenty of pleats so that vacuum is applied in the undercut area. Let cure until the resin has hardened (typically overnight).
Take an in depth look at thewet lay-up process.
Part Finishing
This is where the fun begins! Remove the part from bagging materials and flip it over to see the surface finish. Expect to find a funny looking circle in the middle. This is correct and actually wanted! It is this circle that will need to be cut out.

The other side should also look good and compact. It won’t be glossy and pretty, but that is okay because it will be hidden within the car.

It is now time to remove the plug. Using the rough spot on the glossy side, drill a hole and make a rough cut out of that area. This will allow you to hammer the plug out. Depending on how well the plug was waxed, this can be very easy, or extremely difficult. So make sure to wax well! With the plug removed you will now see the part taking shape:

Use a Dremel or small reciprocating saw to trim back the rest of the interior circle cut out. Once close, use a little sandpaper to add a nice radius. If completed properly, you shouldn’t be able to tell that the flange and the interior cylinder are different pieces of carbon fiber.

With the center cut out, you are now ready for the final trim. We settled on an 8 inch outer diameter and marked this out on the flange. We also trimmed back the cylinder to have a square and smooth end. The result is a pretty complex looking carbon fiber part:


At Common Fibers we are a bunch of perfectionists. We weren’t 100% satisfied with the surface finish of the flange so we decided to sand that down and clear coat it along with the inside of the duct. For such a small part we decided to just use some rattle can clear enamel. It gets the job done and is plenty durable enough for this application.

Here is the part after a few layers of clear coat. It is ready to go!

You can learn more about the intricacies of the finishing process in our posts ontrimming carbon fiber,how to spray clear coat andbuffing and polishing best practices.
Final Build
With the part complete we were ready to install it on the EVO. It fit snug like a glove and looks pretty awesome! Take a look and let us know what you think!


