Your Cart is Empty

HOW TO MAKE A CUSTOM HOT TUB COVER
Platform: Home Improvement
Design: Private Individual
This project was brought to our custom composites manufacturing shop in Seattle, WA by an individual who wanted a custom cover for their in-ground hot tub. Project requirements specified that the cover be as light as possible, built in separate pieces that were easy to move, and that the final product blended in with the surrounding landscaping.
Idea Creation
Project requirements specified that the cover be as light as possible, built in separate pieces that were easy to move and weighed no more than 10lbs each, and that the final product blended in with the surrounding landscaping.Check out our post ondesigning composite partsfor an introduction to our design process!


Plug Creation
Materials: 15lb Tooling Foam, Duratec Sanding Primer
Time Required: 6 Hrs


The plug was machined out of 15lb foam on our 4-Axis CNC machine. The foam was sanded then sanded and sprayed with our high build Duratec sanding primer. For more information on the plug building process check out our process blogs onsplash plug fabrication,machining a foam plug,andplug finishing.
Mold Creation
Materials: Tooling Gelcoat, Fiberglass Chopped Strand Mat, Polyester Tooling Resin

Our customer only needed one cover, so we opted to skip the molding process and to pull a part straight from the plug to save time and expense. This was a viable option because the cover was to be painted and textured. This also meant we weren't concerned with the surface finish that flow and release media leave on the backside (or top, in this case) of the part.
You can learn more about the steps to make a mold in our posts onspraying gelcoat,themold lamination process, andhow to finish your mold.
Layup Process
Materials:6K Carbon Fiber Fabric, Epoxy Resin

Despite the thick coat of sanding primer, a foam plug is still porous. Avoiding air in a VRTM infusion is typically one of the most critical parts of the process. Again, the final painted and textured surface finish allowed for a leaky infusion, as any porosity in the final part would be filled in. It's also worth noting that polyester resin was used. Polyester is less viscous than epoxy, ensuring that the resin would infuse fast enough to make it across the part before curing. A series of wet lay-ups were also performed on the underside of each piece to add stiffness in order to maintain their shape. Check out our blog posts on theVARTM infusion process and check back for our upcoming post on troubleshooting a leaky infusion.
Part Finishing
Materials: Textured Paint


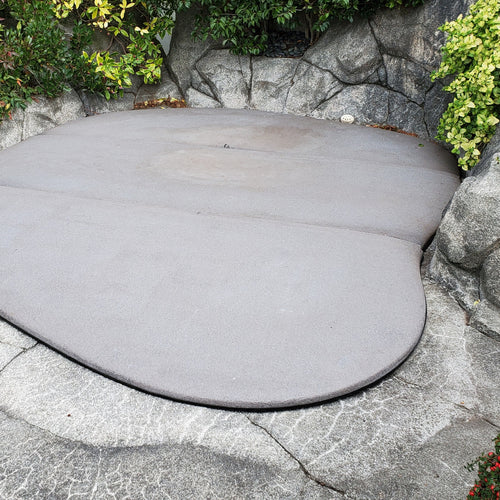
The cover was finished with a textured paint, color matched as closely as possible to the surrounding granite concrete.
You can learn more about the intricacies of the finishing process in our posts ontrimming carbon fiber,how to spray clear coatandbuffing and polishing best practices.
Final Build

