Your Cart is Empty
DESIGNED IN SEATTLE | MADE IN SEATTLE
DESIGNED IN SEATTLE | MADE IN SEATTLE

05 - PLUG FINISHING
November 25, 2019 4 min read
In ourPlug Machiningblog, we learned the basics of using a CNC machine to fabricate a plug out of high-density foam. Before the plug can be used to make a mold, a few finishing steps must be undertaken to properly prepare the plug surface. We’ll talk in greater detail about the specifics of fabricating the mold in ourMold Lamination blog post, but it’s important to know that the surface of the mold will be made by painting a durable layer of gelcoat onto the plug, and that it will be an exact reflection of the plug surface. So, we need to give the foam plug a smooth, durable surface without imperfections. As we say at CF: Do the Hard Work Up Front!
Do the Hard Work Up Front!
Shaping the Foam Plug
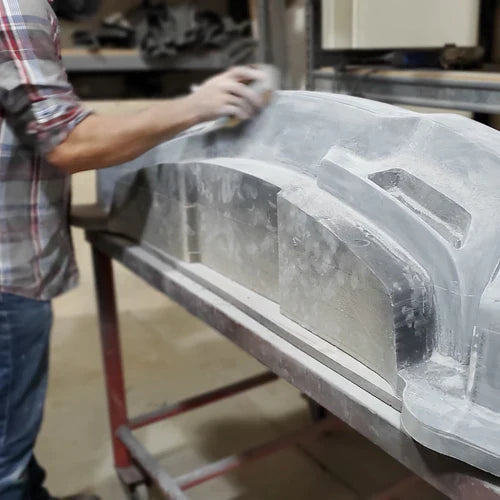
The first step to finishing the plug is to sand out any machining marks with an aggressive sandpaper (80-180 grit works well). Machining marks tend to be more prevalent along steep slopes and in inside radii, so pay close attention to these areas. Surfaces with little change in curvature usually only need a light sanding with higher grit sandpaper. Be careful not to sand too aggressively as you can easily change the shape of the plug surface. We typically avoid using hard sanding blocks or power sanders as you can very quickly sand away too much material with these tools.
If there are large imperfections in the surface of the plug, fill them with a body filler like Bondo and sand the filler to the correct shape. The foam around the filler will sand away more quickly than the harder filler material, so be careful not to sand too aggressively or you might end up with low spots around the repair. Don’t try to perfect the repairs either—they’ll be easier to fine tune once harder sanding primer has been painted on the foam, protecting the foam from aggressive sanding. Any small nicks and imperfections can be repaired with filler after the foam has been painted.
Be careful not to sand too aggressively as you can easily change the shape of the plug surface.
First Round of Surface Primer
When you are happy with the shape of the plug and the surface is smooth and uniform, it’s time to paint the foam with sanding primer. We use a high-build primer called Duratec, made by Dura Technologies, which is available through composite material distributers. You can apply Duratec with a brush by hand, requiring very little equipment, but we prefer to spray it with a High Volume Low Pressure (HVLP) spray gun in our booth, as it creates a more consistent surface that’s easier to sand. We aim to spray primer 20-30 mils thick, knowing that we’re going to sand a few mils off. It is near impossible to get the surface perfect on the first coat, so it is safe to plan for spraying a second coat after sanding. Try your best to apply the primer as evenly as possible to avoid changing the shape of your plug, and to avoid creating more sanding work.
Try your best to apply the primer as evenly as possible to avoid changing the shape of your plug
Sanding the Primer
When the sanding primer has dried, you can repair any small defects with body filler and move on to low grit sanding. We typically begin sanding with 120-180 grit sandpaper, though you can start lower or higher depending on the smoothness of the primer. At these higher grits we will often use an orbital sander on large flat surfaces, as the primer is harder than the foam and there is less risk of removing too much material. If you do remove too much material and you see foam through the primer, you will need to reapply more primer. In our experience, foam will stick to the gelcoat of the mold and make it extremely difficult to remove the plug and can even damage your mold. It is your goal to sand the plug to its final shape and eliminate all pinholes and defects. You can use a body filler to fill larger defects that won’t sand out. Once the shape is reconfirmed, you are ready to spray your finish coat of primer.
Avoid sanding through to the foam.
Final Round of Surface Primer
Your finish primer should not be sprayed in an attempt to fill more defects. The job of this layer of primer is to cover all body filler and foam in one smooth layer. This can be painted on with a foam brush, but it is highly recommended to spray again with an HVLP gun. We will reduce this round of primer with 10% acetone to thin it out and apply a very even layer. It is also recommended to spray from a few inches further back to reduce orange peel texture on the part. We shoot for ~0.010” additional thickness.
Reduce the primer with 10% acetone to thin it out and apply a very even layer.
Finish Sanding
If spraying went well and all steps above were followed, the surface of your plug should be fairly smooth and uniform. You can start sanding with 320 grit dry sandpaper and transition to 400 grit wet sandpaper after the entire surface is sanded and it is confirmed that the plug is free of defects. We recommend sanding up to at least 800 grit, stepping through the grits. You can leave your plug at 800 grit if you are looking for a matte surface finish on your mold, but if your part surface needs to be shinier, you can sand all the way up to 1200 grit and buff the primer with cutting and polishing compound. Keep in mind that your mold surface can only be as shiny as your plug surface (without post work), and your final part will have the same sheen as well. So, if you want your part to shine and you don’t plan to clear coat and buff it, spend the extra time to make your plug shiny!
Your mold surface can only be as shiny as your plug surface!
By now you should have a shiny, durable plug that is ready for mold-making service. Read ourMold Finishing blog, to learn how we “pull” a mold off of a plug!
Subscribe
Sign up to get the latest on sales, new releases and more …