Your Cart is Empty
DESIGNED IN SEATTLE | MADE IN SEATTLE
DESIGNED IN SEATTLE | MADE IN SEATTLE

04 - SPLASH PLUG FABRICATION
December 09, 2019 5 min read
What is a splash plug and when is it appropriate to use this method?
Common Fibers incorporates new and developing technologies into our daily workflows, but for many of the tools and methods we use, we do so because they are proven and reliable methods. Fiberglass became a popular choice for industrial tooling applications in the 1940’s, so there is plenty of experience to draw from. If you have parts you want to reproduce in carbon fiber or fiberglass, creating a splash plug is the easiest method and will yield professional results.
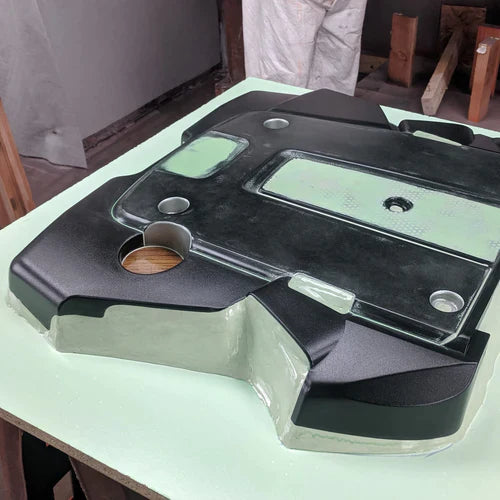
A splash plug is an exact representation of the part being reproduced and is the first step in creating a mold. We build splash plugs when we have access to the exact part we want to reproduce. We also build splash plugs because it requires minimal skill and basic tools. These methods usually leave the original part without any damage, and aside from the mold materials, the waste can often be repurposed.
The following guide will highlight the important elements to keep in mind while building your splash plug and provide step-by-step instructions for the entire process - from preparing the OEM part to a completed splash plug, ready for gelcoat application. You can explore theGelcoat Application, Lamination, andMold Finishingprocesses in more depth through ourDIY Blogs.
Tools:
|
Materials:
|
Part Prep
Examine the part surface for any defects and sand them out. Before you spray gelcoat on your plug, you’ll want to settle on a mold finish. If you want mirror finish parts, spend more time sanding up the ladder (using increasing grits of sandpaper to achieve a progressively smoother surface finish). Start with dry 120, 180, and 220 grit paper with a block, moving up the commonly found intervals. You can switch to wet and go from 320 to 1000.
Plan the Flange
Imagine the flange as the brim of a hat like a fedora or bowler, only instead of adding the brim to the crown of a hat, you are adding a brim around the lowest edge of the part. This flange will provide a surface off of the part, where tacky-tape and vacuum bag will be applied. For vacuum-infusion, we require a flange which is at least 6” wide to accommodate the tacky-tape, resin lines, and vacuum bagging.
Visualize the path your flange will make around the part and how it will interact with the melamine board you are using as a ‘base board’. Tacky tape works best on flange that is uniform and free of transitions or angular joints, so try to use as few pieces as possible to create it. If your part has undercut details, consider making a multipart mold to capture that information.
An important aspect of constructing the flange is addressing where it meets the part. You will eventually need to fill any gaps with clay, then cleanly remove clay from the surface of the part. We use Plastilina, a white modeling clay that won’t dry out if you leave it in the open. It is easy to manipulate by hand especially when warmed up. Use hot water to soften it so that it will easily push into gaps. You can also warm tools in hot water to shape and trim the clay cleanly.
Support and Affix your Part to the Base Board
Lay out your part on the base and mark off where the part will be located. Take note of any flexing and distorting of the part as it lays on the board, so you can see where and how to support the part for accurate molding. The supports should be inside the splash plug when your part and base are connected and your flange is complete. This will make sure your part comes out with the right dimensions and correct deflection when finally mounted. Construct your supports using 2”x4” studs cut to size with a circular saw or chop saw. You can screw your supports into the melamine if you choose, or you can use a hot-glue gun. Use hot glue to attach your part to its supports as hot glue is very easy to remove from your part without damaging it.
Flange Construction
You can mock up your flange with paper or cardboard and transfer this to your flange material. This is especially helpful if you need to make molds for two mirrored parts, such as front fenders, to save time and double-work. Transfer your templates onto smooth, flexible material like Masonite, plastic, or wood veneer panels. Flexibility will help your flange sections flex into shape and can help reduce the number of pieces you need. Use a combination of rectangles and triangles to create smooth transitions in your flange around complex details, especially rounded corners that change from horizontal to vertical surfaces. Cut your pieces and try putting them into place. Make small trim adjustments so the flange is well supported with minimal gaps. When attaching your flange, include flange supports behind it to prevent breakage while applying fiberglass later. You can build these out of plywood, left over stud blocks, Masonite or plastic scrap. Smooth out any transitions with clay or wax fillets. If you have an especially rough transition, you can simply cover it with flashing tape. Vertical flange surfaces can also be tricky for Tacky tape, so include a slight incline when you can. Be careful not to make any flanges that result in undercut geometry!
Use of Clay
Examine your flange edges for gaps or abrupt corners and fill these with modeling clay. Using wax fillets can reduce time on this step as well, just heat your fillets in place with a heat gun and press to fit. Hot glue helps adhere your fillet to get you started. Remove excess clay and debris from the part surface and clean up any excess around edges and returns. Some parts need to be a specific thickness, so clearing clay away to maintain the return edge will be required. Conversely, if you want to remove or “delete” any information from the part, you can fill with clay or sand/grind the information off of the part.
Wax
Apply your preferred wax/release system. We add 4 layers of TR wax, applying the wax and waiting about 5-10 minutes until cloudy, then buffing with a clean cloth and waiting 30 minutes to apply the next coat. Your process here will vary depending on the release you use, so always read and closely follow the directions on the container for best results.
Next Steps
Once your plug has been built, all gaps and transitions filled, and the entire surface waxed, you are ready to apply gelcoat. We spray 3 coats at 10 mils each for a total thickness of 30 mils. When the gelcoat is appropriately tacky, you’ll want to apply at least your first layer of fiberglass. IMPORTANT NOTE: If you are creating additional molds off of underside features, DO NOT remove the original part from the newly created mold. Simply remove the melamine and flange and supports, then capture the important details and any locating features on the newly exposed side with the same splash molding technique described earlier. Working in this order will help the molds fit into place again.
The steps we take forSpraying Gelcoat,Mold Lamination, as well asHow to Finish your Mold are detailed thoroughly and available on ourDIY Blog.
If you have faced questionable situations in your own productions and have experiences to share, submit them in the field below and we may use your advice as a basis for further blog posts. Also, check out our DIY Blogs for more information on the processes, projects and various troubleshooting methods found in the Common Fibers shop.
Subscribe
Sign up to get the latest on sales, new releases and more …