Your Cart is Empty

09a - INFUSION LAY-UP
The three most common lamination, or ‘lay-up”, methods used to transform raw carbon fiber into solid composite parts are infusion, pre-preg, and wet layups. We typically use the infusion process for parts that are 20 square feet or less and that require pressure to create the intricate detail and high strength you get from a well “compacted” part. In the following paragraphs, we’ll walk you through the infusion process, step-by-step.
Tools
- Mold
- Scissors
- Food Scale or Graduated Measuring Device
- Vacuum Pump & Hose
- Catch-Pot
- Clamps
- Plastic Wedges
- Hammer
Materials
- Chemical or Wax Release Agent
- Composites Specific Spray Adhesive
- Woven Carbon Fiber
- Flow Media
- Release Cloth
- Spiral Tubing
- Clear, Flexible PVC Tubing
- Tacky Tape
- Plastic Sheet
- Resin & Hardener (Catalyst)
- Disposable Container for Mixed Resin
- Stir Stick
- Disposable Gloves
Process
First, you must clean the mold and “release” it with a chemical or wax release agent appropriate to the type of mold and resin used; this ensures that the part won’t get stuck in the mold. A thick double-sided “tacky” tape is then applied in a ring around the mold flange. This tape will later create the airtight seal needed to remove air, or “pull vacuum”, in the mold cavity. A successful infusion lay-up is dependent on the design and quality of the mold – most critically, whether or not we’ve achieved a non-porous surface. For more information on mold making and best practices, check out our posts onMold DesignandFinishing.
A successful infusion lay-up is dependent on the design and quality of the mold.
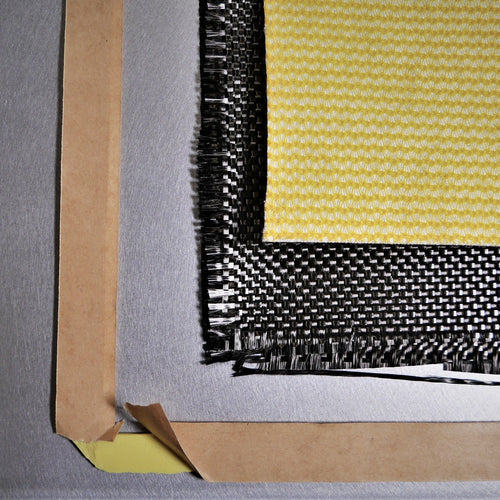
Dry, woven carbon fiber is then laid into the mold cavity. A composite specific spray adhesive is used to tack the carbon to the features in the mold, layer by layer. If the part needs to be cosmetic – meaning the weave will be visible in the final product - the first layer is carefully worked into the mold from the center to the edges, as uniformly as possible. Maintaining the weave pattern around the different features of the part requires artistry and strategy on the part of the lay-up technician. Care must also be taken with subsequent layers to avoid “bridging”, or areas where the carbon is stretched across a feature rather than tightly adhered to the surface. If bridging does occur a cavity is created and resin will fill it, which then appears on the surface of the part as a clear or milky void in the weave. The thicker the part, the more layers of carbon are required. Keep an eye out for our upcoming article on types and thicknesses of woven carbon fiber for more information on this part of the process.
Maintaining the weave pattern around the different features of the part requires artistry and strategy on the part of the lay-up technician.

In addition to laying carbon fiber into the mold, release cloth, flow media, and resin tubes are placed on top of the carbon fiber layers. Flow media allows resin to flow quickly across the carbon while release cloth prevents the flow media from incorporating into the part along with the resin. Spiral tubing is set on top of the flow media at opposite ends of the part. One line of tubing will feed resin in, while the other line is connected to the vacuum. There are different strategies for laying out the release cloth, flow media and tubing based on variables like part size, resin type and ambient temperature. In general, you want to minimize the distance that the resin must travel. Place the vacuum point higher than the resin entry point to allow air bubbles to escape more freely.
In general, you want to minimize the distance that the resin must travel.
Plastic bagging is then draped over the mold cavity and adhered to the flange with the double-sided tape that was placed in the first step. The bag must be large enough to fit over all the features of the part when vacuum is pulled, which usually means that pleats must be made in the bag to create extra space. Wondering what a pleat is? Stay tuned for ourvideo tutorial on pleating.

Once the mold cavity is sealed closed with the bag and tacky tape, air is removed through spiral tubing connected to a “catch pot” and vacuum pump. A catch pot is an airtight container that serves as an intermediary receptacle to catch excess resin that has been pulled through the part, before it can get into the vacuum pump. The catch pot also features a pressure gauge, a port for the hose connected to the vacuum, and a second port for the tube running from the part. The gauge shows the pressure in the mold cavity and indicates whether or not the bag is fully sealed to the flange - when the gauge reaches 30 in Hg and is able to hold that pressure when the vacuum is shut off (i.e., there are no air leaks in the system), the part is ready to be infused.
As the part infuses, resin moves through the flow media and slowly saturates the carbon fiber below. If the tubing and flow media have been set up correctly, the resin will move evenly across the part towards the vacuum tube. Don’t go grab a beer just yet though! If the tube and flow media strategy isn’t quite right or the bag isn’t 100% sealed, this step will be fraught with issues. We’re working on putting together a comprehensive trouble shooting guide specifically for issues that come up during infusions – check back for it soon.
Once the part is fully infused, the resin and vacuum tubes are clamped off and the catch pot/vacuum system can be removed. The part should remain under full vacuum until the resin has cured. Depending on theresin systemthis can take 3-12 hours. After the resin cures, the bag, flow media and release cloth are removed. Plastic wedges that won’t damage the mold or part are used to carefully lift the edges of the part from the flange, ‘popping’ it out of the cavity. Static electricity can be generated as it lifts from the mold surface. Carbon is highly conductive so take caution when touching the part to lift it out. The results can be shocking!
The part should remain under full vacuum until the resin has cured. Depending on the resin system this can take 3-12 hours.
Now that you’ve successfully infused a beautiful carbon fiber part, it’s time to trim off the raw edges. Read our next post onTrimming Carbon Fiber Parts to learn how we do it!